

How To Test Microphone On Windows 10
One time y'all install a microphone on Windows 10, you'll want to configure information technology. That means changing sound levels, input types, and making sure that it sounds crisp. If yous're setting upwards for gaming or streaming, y'all might desire to test some audio furnishings for your microphone, likewise.
And so, here's how to test your microphone on Windows 10 before you start using it.
ane. Windows ten Sound Settings
The starting time thing to check is the Windows x Sound Settings, a list of all things relating to audio and microphones. To open the Audio options:
- Input sound in your Beginning Menu search bar, then select the Best Friction match.
- Afterwards the Audio carte du jour opens, scroll downwards to Input. Make sure your microphone is selected every bit the default input device. Use the dropdown carte under Choose your input device to make the alter to a dissimilar microphone option.
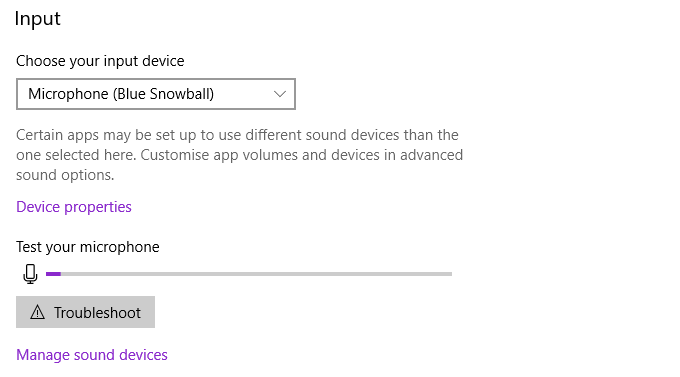
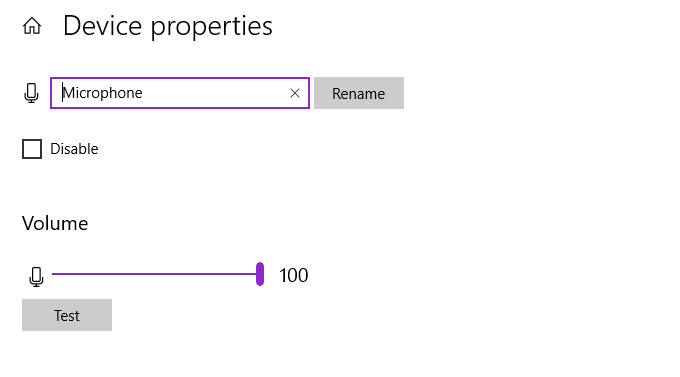
From hither, you can change a small range of microphone properties. Select Device backdrop. From this menu, you tin rename your device, disable the microphone, and adjust the microphone volume. Depending on your microphone type, y'all may too see the option to heave your microphone book here.
However, the microphone direction and settings bachelor from this menu are not every bit extensive as the "sometime" settings bill of fare. So, if yous want more options, cheque out the section below.
2. Audio Control Panel
Windows 10 began the switch from the former, tried and tested Command Panel, to the new Settings style. The new Settings menus are easier to utilise with touchscreen devices and streamline many options into easier to detect menus. But there are still some settings that oasis't made the total switch to the new Settings and, every bit such, you accept to head back to the Control Panel to find them.
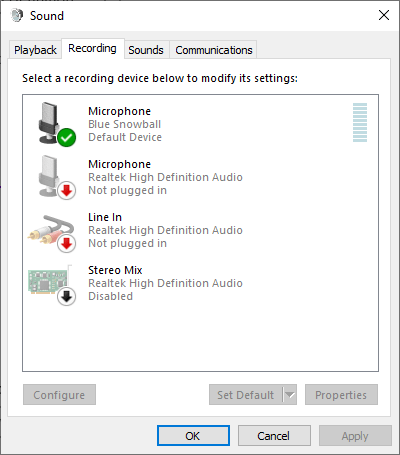
From the Windows 10 Sound Settings menu, y'all tin select Sound Control Panel from the top-right bill of fare, then select the Recording tab. Alternatively, printing Windows Central + R to open the Run dialog, then input mmsys.cpl and press OK.
Now, right-click your microphone and select Backdrop. A new window will open with several tabs. Open up the Enhancements tab. These options relate to microphone boosting, sound suppression, and other actress features. The enhancements you lot see depend on your microphone.
- Acoustic Repeat Cancellation: Reduces repeat noises inside your local surroundings.
- Far Field Pickup: Can improve recording quality when farther away from the microphone.
- Keystroke Suppression: Attempts to suppress noisy keystrokes.
- Beam Forming: Enhances input from the microphone, suppressing noises exterior the range.
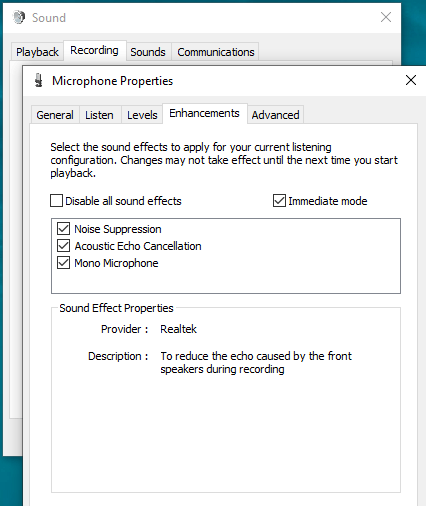
Y'all tin as well observe options for different types of microphone boosts in this menu. Play effectually with the Enhancements until you detect a suitable level of input for your requirements. The Sound Control Panel and microphone enhancements are a skillful set up for microphone sensitivity.
3. Which Apps Tin Apply Your Microphone?
From time to time, you lot might consider which apps actually take access to your microphone. Yous don't want any unexpected apps listening into your day-to-24-hour interval activities, specially if you lot go along your microphone plugged in, on your desk.
- Input privacy in your Start Card search bar and select the Best Match.
- Select Microphone from the left-hand list.
- Whorl downwardly and assess the apps with access to your microphone. If there'due south anything you lot don't desire to grant access to, tap the toggle to switch it off.

Looking to upgrade your microphone? Check out the top microphones for live streaming and other recordings.
4. Equalizer APO with Peace GUI
If you want to fine-tune the mode your microphone sounds, you'll need third-party audio software. While there are many options available, Equalizer APO is one of the easiest to employ and is free to kicking. However, Equalizer APO on its own is a command-line tool, but there are a number of free graphical user interfaces (GUIs) you tin can install, which makes using the program much easier.

- Download and install Equalizer APO. During the installation procedure, you lot'll select your Playback and Capture devices. For example, I choose Speakers from the Playback tab and Microphone from the Capture tab. The Capture tab will display the name of your microphone, so you know which option to select.
- At present, download and install Peace Equalizer. You tin just install Peace after the Equalizer APO installation completes. If y'all attempt it offset, it will fail. Once the installation completes, select Beginning Peace (otherwise, you lot can notice Peace in your Start Menu).
When Peace loads, you must choose either the Elementary interface or the Full interface. The Full interface offers more customization options than the Simple version, granting greater control over your microphone output.
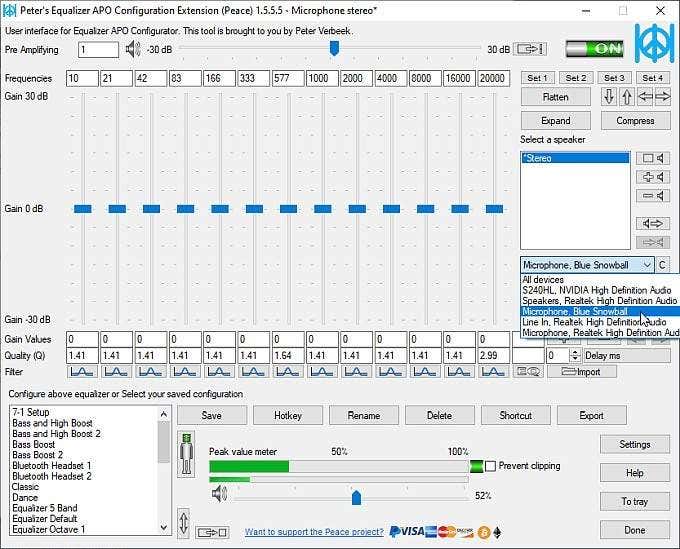
Select your microphone input from the dropdown menu. Now, y'all tin slide the equalizer levels up and down until you find the output levels you desire. There is also the pick of increasing your book output using the amplifier bar, found at the top of the window.
When you lot find the microphone level sweet spot, select Salvage, give your configuration a proper noun and select a tray icon to display when the configuration is in apply. This terminal action isn't completely necessary but is handy when y'all want to check your configuration is on at a glance.
5. Speech Recognition
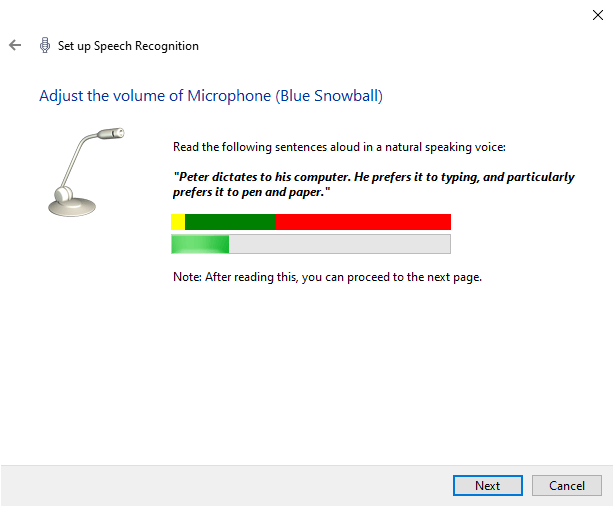
Another way to test your microphone is by using Windows 10 Spoken language Recognition. Speech Recognition allows yous to command your computer using your voice. The setup process also helps configure your microphone, which is a bonus.
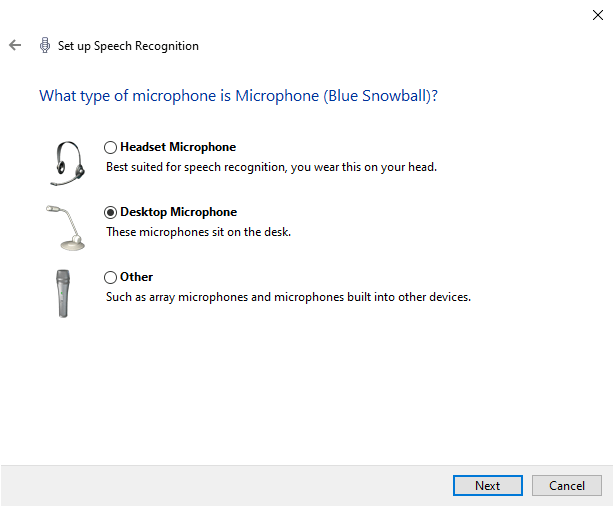
- Input speech recognition in your Start Bill of fare search bar and select the Best Match.
- Choose your microphone type from the list, then continue.
- Now, you'll speak a test sentence to configure the microphone. You may need to motility your microphone around your desk-bound to ensure information technology hits the correct level.
- The next page considers speech recognition accuracy. Windows 10 can analyze your documents and emails to meliorate oral communication recognition, tuning into your common phrases. If y'all don't want Windows to clarify your documents and emails, select Disable certificate review.
- Adjacent, choose what happens when yous say End Listening. If you lot select manual activation, you must manually switch on speech recognition whenever you lot want to employ it. If you select phonation activation, Windows 10 volition listen for your Starting time Listening command before activating.
- Finally, choose whether y'all desire to Run Oral communication Recognition at get-go-upwardly. Switching this option on volition allow voice communication recognition to load with the operating system, meaning it volition ever be available when you need it without having to switch it on manually.
Speech recognition is a quick way to test that your microphone is working with Windows 10. You lot don't have to keep speech recognition switched on, or fifty-fifty complete the setup process past step iii in the in a higher place list if all you desire to do is bank check if the microphone is responding.
Test Your Microphone Configuration
You lot've seen five easy methods for testing your microphone configuration out. Some options are ameliorate for optimizing your output, while others test that the microphone is operating correctly. Either way, you at present know how to test and configure your microphone before use.
If your microphone isn't working at all, check out how to fix a microphone non working on Windows 10.
Do not share my Personal Data.

How To Test Microphone On Windows 10,
Source: https://helpdeskgeek.com/windows-10/how-to-test-your-microphone-in-windows-10/
Posted by: smithhild1992.blogspot.com
0 Response to "How To Test Microphone On Windows 10"
Post a Comment